Cheesy Chicken and Bacon Pasta Bake (The 50g Protein One-Pan Wonder)
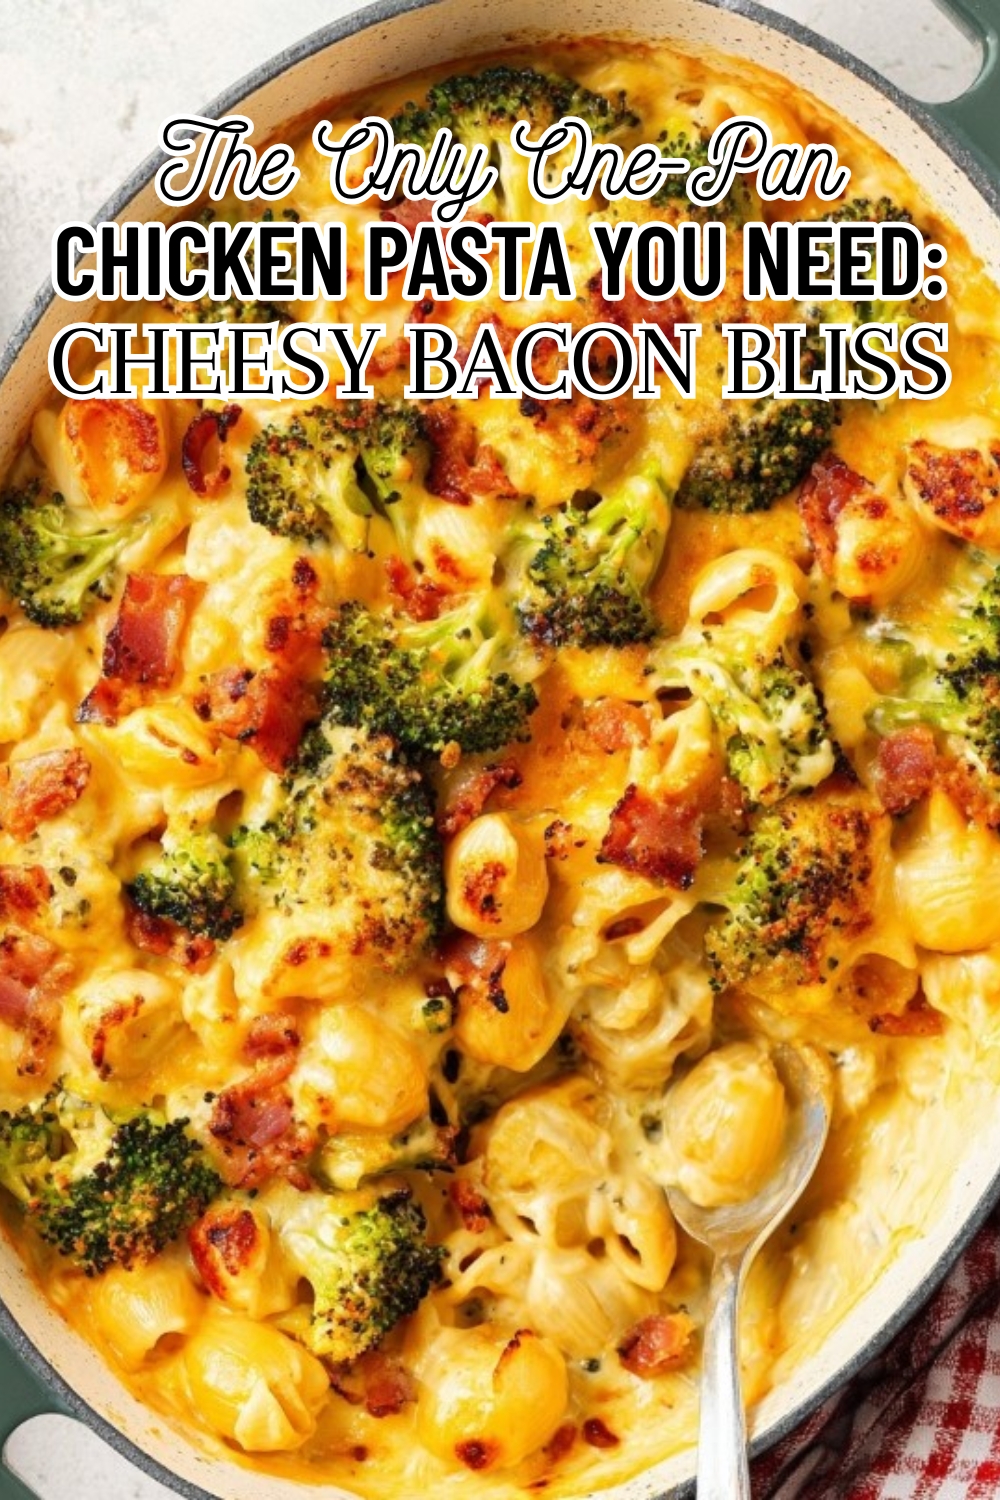
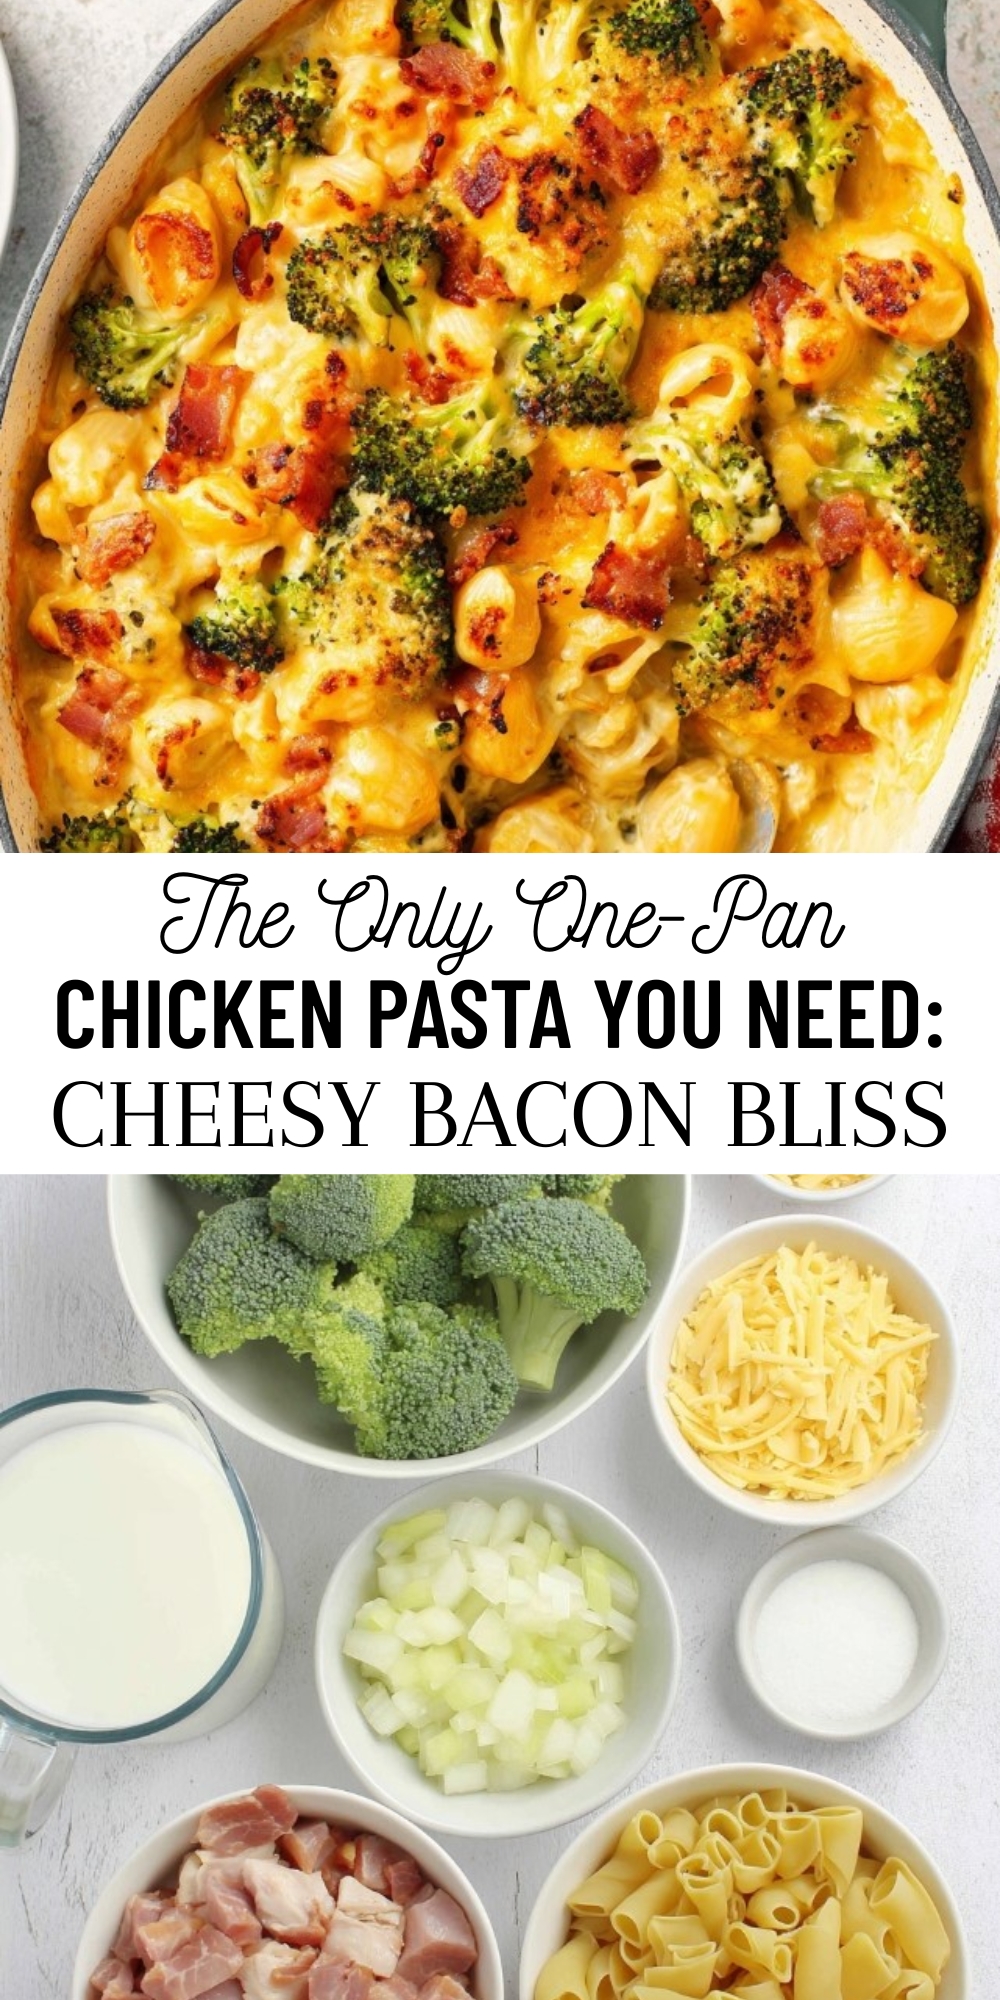
Stop settling for dry casseroles. This Cheesy chicken and bacon pasta bake fixes dinner with a sauce built directly on rendered bacon fat, creating a rich, smoky velvet that clings to every noodle. It’s the ultimate high-protein comfort solution that feels like a warm hug.
Why This Recipe is a “Forever Favorite”
- The “Liquid Gold” Base: Instead of a bland oil base, we use rendered bacon fat to cook the flour. This infuses a deep, savory smokiness into the milk that simple seasoning can’t replicate.
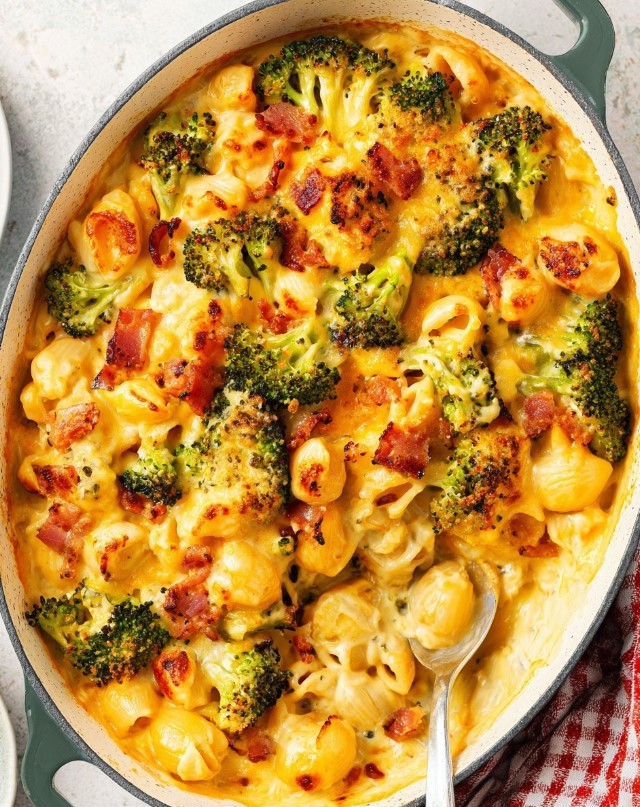
- Texture Nirvana: By finishing under the broiler, you get the best of both worlds: a gooey, molten center and a shatteringly crisp, golden top layer.
- One-Pan Sanity: Building the sauce, cooking the meat, and baking the final dish happens in the same skillet. Less scrubbing means more time relaxing.
Building the Perfect Bite
I am obsessed with meals that deliver high protein (50g per bowl!) without tasting like “gym food.” This dish balances the savory punch of thick-cut bacon with the fresh snap of broccoli. It’s hearty, wholesome, and incredibly satisfying for the whole family.
Pairing for Balance
Because this bake is gloriously rich, I always serve it with a bright, acidic side. My Rustic Mediterranean Vegetable & Feta Salad cuts right through the creaminess. If you have picky eaters or need a lighter finish, a scoop of Cardamom Mango Frozen Yogurt is a refreshing palate cleanser.
Step-by-Step to Smoky Perfection
Start by crisping your bacon in a deep skillet; don’t rush this, as you want all that delicious fat to render out. Once the bacon is removed, sear your chicken in the same pan—no flavor gets left behind. After softening your onions and garlic, you’ll sprinkle flour right over the meat to create a rustic roux.
Slowly whisk in the milk until the sauce coats the back of a spoon. It should look glossy and smooth. Stir in your mustard, spices, and half the cheese until melted. Finally, toss in your cooked pasta and blanched broccoli, top with the remaining cheese, and broil until bubbly.
(Note: If you love meal prepping chicken for the week, check out my Savory Herb Baked Chicken Breasts for another reliable staple.)
Expert Tips for Success
- The Broccoli Warning: Only blanch the broccoli for about 3 minutes. If you boil it fully with the pasta, it will turn to mush in the sauce. You want a little “bite” left.
- Watch the Broiler: I have learned this the hard way—do not walk away! The cheese goes from golden to burnt in seconds. Stand there and watch the magic happen.
- Sauce Consistency: If your sauce gets too thick (like glue) before you add the pasta, just splash in a tablespoon or two of hot water or milk to loosen it up.
Essential FAQs
Can I make this ahead of time?
Yes! You can assemble the entire dish up to the broiling step, cover it, and refrigerate it for up to 24 hours. When ready, bake at 350°F (175°C) until warmed through, then hit the broiler.
What if I don’t have a cast-iron skillet?
No problem. You can make the sauce and mixture in a regular large frying pan, then transfer everything to a greased 9×13 baking dish before adding the cheese topping and broiling.
Cheesy Chicken and Bacon Pasta Bake (One-Pan Sauce)

This wholesome dinner combines tender chicken, savory bacon, and crisp broccoli in a rich, homemade cheese sauce that comes together in a single skillet. By using the rendered bacon fat to build the sauce base, we create a depth of flavor that feels indulgent without being heavy. It is a satisfying, high-protein meal perfect for busy weeknights.
- Prep Time: 15 minutes
- Cook Time: 25 minutes
- Total Time: 45 minutes
- Yield: 4 servings 1x
- Category: Main Course
- Method: Stovetop / Broiler
- Cuisine: American / Continental
Ingredients
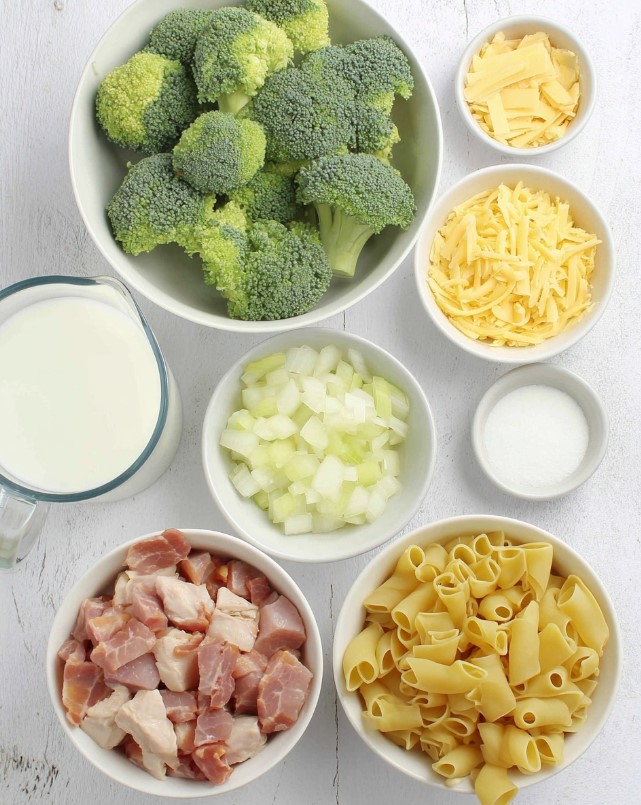
- 10 oz dried short pasta (such as penne, rotini, or fusilli) (approx. 280g)
- 1 large head broccoli (cut into bite-sized florets) (approx. 300g)
- 1 tbsp olive oil (15 ml)
- 7 oz thick-cut bacon (chopped into 1/2-inch pieces) (approx. 200g)
- 10 oz boneless, skinless chicken breasts (cut into 1-inch chunks) (approx. 285g)
- 1 medium yellow onion (peeled and chopped)
- 3 cloves garlic (minced)
- 1/2 tsp smoked paprika (optional, for depth)
- 2 tbsp all-purpose flour (approx. 16g)
- 2 cups whole milk (475 ml)
- 1 tsp whole grain or Dijon mustard
- 1/2 tsp kosher salt (plus more for pasta water)
- 1/4 tsp freshly ground black pepper
- 1 1/2 cups shredded cheese (blend of sharp cheddar and mozzarella), divided (approx. 5 oz / 150g)
Instructions
- Boil the pasta and vegetables: Bring a large pot of salted water to a rolling boil. Add the pasta and set a timer for 2 minutes less than the package directions for al dente. When there are 3 minutes left on the timer, add the broccoli florets to the pot. Cook until the pasta is tender but firm to the bite and broccoli is bright green. Drain well and set aside.
- Crisp the bacon: While the water boils, heat the olive oil in a large, deep oven-safe skillet (like cast iron) over medium-high heat. Add the chopped bacon and cook for 5–6 minutes until the fat renders and the edges are crispy and browned.
- Sauté the chicken: Add the chicken chunks to the skillet with the bacon. Cook for 4–5 minutes, stirring occasionally, until the chicken is golden brown on the outside.
- Soften aromatics: Reduce heat to medium. Add the chopped onion, minced garlic, and smoked paprika. Sauté for 3–4 minutes until the onion is translucent and softened, and the chicken reaches an internal temperature of 165°F (74°C).
- Build the sauce: Sprinkle the flour evenly over the meat and vegetable mixture. Stir constantly for 1–2 minutes to cook off the raw flour taste (the mixture will look pasty).
- Simmer: Slowly pour in the milk while stirring continuously to prevent lumps. Simmer for 3–5 minutes until the sauce thickens enough to coat the back of a spoon. Stir in the mustard, salt, black pepper, and half of the shredded cheese until melted and smooth.
- Broil: Preheat your oven’s broiler (grill) to high and position the rack about 6 inches from the heat source. Add the drained pasta and broccoli to the skillet and toss to coat evenly in the sauce. Top with the remaining cheese.
- Finish: Place the skillet under the broiler for 3–5 minutes. Watch closely! Remove immediately when the cheese is bubbling and spotty golden brown. Serve hot.
Notes
- Allergy Alert: Contains Wheat (Gluten) and Milk (Dairy). To make this gluten-free, use a certified gluten-free pasta and a gluten-free 1:1 flour blend.
- Why it works: Cooking the flour with the bacon fat and onions creates a “rustic roux,” thickening the milk without needing a separate pot for a béchamel sauce.
Key success warnings:
- Broccoli texture: Do not boil the broccoli for the full duration of the pasta cooking time, or it will turn to mush in the sauce. It only needs a quick blanch (3 minutes).
- The Broiler: US broilers are powerful. Do not walk away during step 8. The cheese can go from golden to burnt in less than 60 seconds.
- Sauce consistency: If the sauce becomes too thick after adding the cheese, stir in a splash (1-2 tbsp) of hot water or milk to loosen it before adding the pasta.
Nutrition Facts (1 bowl): Calories: 815 | Total Fat: 43 g (Saturated Fat: 17 g) | Sodium: 1390 mg | Potassium: 850 mg | Total Carbs: 67 g (Fiber: 4 g, Sugars: 9 g) | Protein: 50 g
These values are approximate and may vary based on ingredients and preparation.
There is something deeply grounding about pulling a bubbling skillet out of the oven. It signals that the work is done and the enjoyment is about to begin. I hope this becomes a regular in your rotation!
Disclaimer: I’m just a mom sharing the recipes that keep my family happy and fed, not a nutritionist. Always listen to your own body (and your doctor) when making dietary changes!
- Save for Later2.0K
")
")
