Drumstick Layered Dessert
Drumstick Layered Delight: More Than Just Ice Cream
Remember the thrill of hearing the ice cream truck jingle echoing down the street? For many of us, that sound instantly conjures up images of one particular treat: the Drumstick. That iconic combination of a sugar cone, vanilla ice cream, a hard chocolate shell, and a crown of crunchy peanuts is pure summer nostalgia. But what if you could take that beloved childhood favorite and transform it into something even *more* spectacular? Something you could share (or, let’s be honest, not share) at your next gathering? That’s exactly what we’ve done.
Beyond the Cone: A Layered Dessert Dream
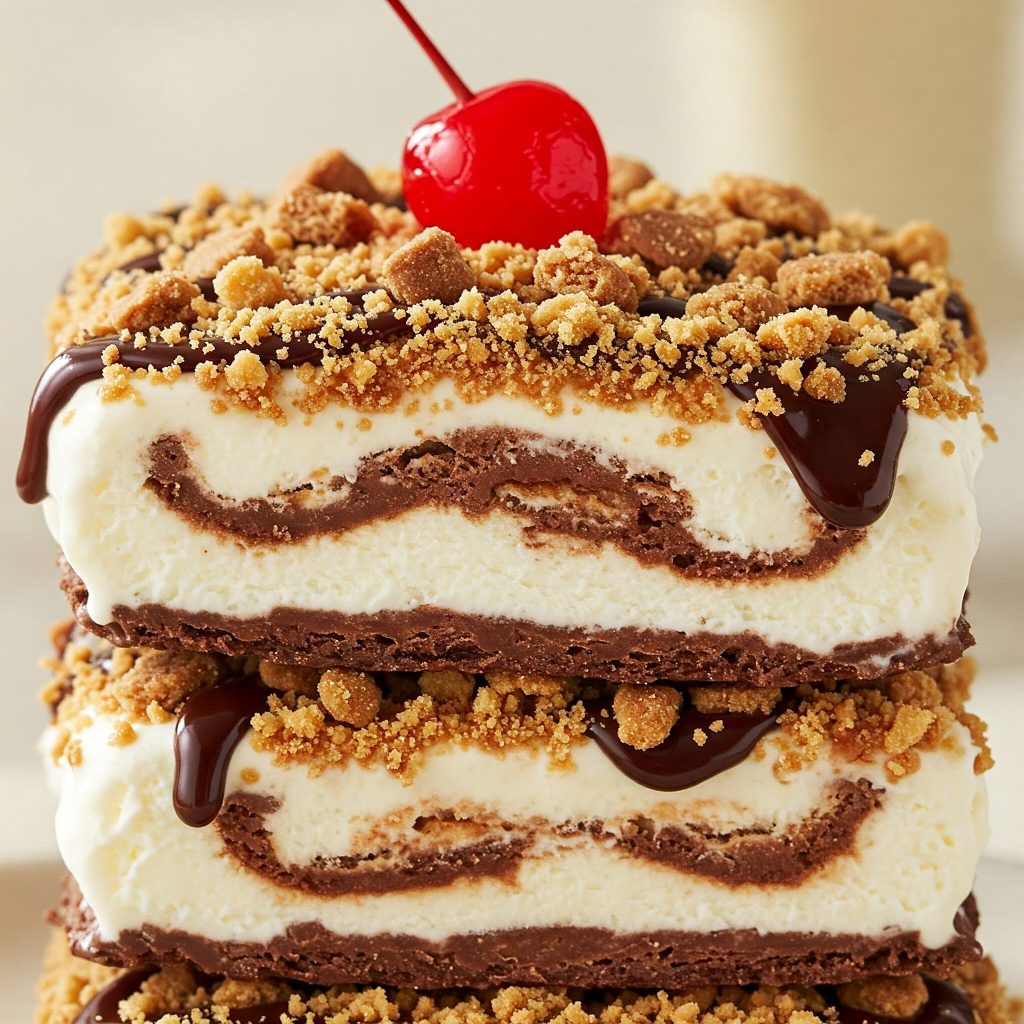
This isn’t just about recreating a Drumstick; it’s about elevating it. We’re talking about layers of deliciousness, carefully crafted to deliver the perfect balance of textures and flavors. Imagine sinking your spoon through a crispy, buttery waffle cone crust, then into a layer of rich, dark chocolate ganache that melts in your mouth. Next comes a generous helping of creamy, premium vanilla ice cream, smooth and cool against the chocolate. And finally, the *pièce de résistance*: a crackly, crunchy topping of Magic Shell chocolate and roasted peanuts, providing that signature Drumstick finish.
Why You’ll Love This Drumstick Layered Dessert
This recipe isn’t just about satisfying your sweet tooth (though it certainly does that!). It’s about:
- Nostalgia with a Twist: It captures the essence of a classic treat while adding a sophisticated, layered presentation.
- Easy Indulgence: While it looks impressive, it’s surprisingly simple to make. No special ice cream-making skills required!
- Crowd-Pleasing Perfection: This dessert is guaranteed to be a hit at any gathering, from summer barbecues to holiday parties.
- Customizable Goodness: Feel free to get creative! Swap out the vanilla ice cream for your favorite flavor, or try different types of nuts for the topping.
Get Ready to Layer Up!
We’ve carefully crafted this recipe to be both delicious and easy to follow. Below, you’ll find step-by-step instructions, helpful tips, and even some suggestions for variations. So, gather your ingredients, preheat your oven (just kidding – no baking required!), and get ready to create a Drumstick Layered Delight that will have everyone asking for seconds (and thirds!).
Let’s dive in!
Servings: 12
Prep Time: 40 minutes
Freezer Time: At least 5 hours (preferably overnight)
Ingredients:
- Crushed Waffle Cone Base:
- 10 thick waffle cones (or sugar cones)
- 5 tablespoons unsalted butter, melted
- 1/4 teaspoon ground cinnamon (optional, for a warm flavor)
- Rich Chocolate Layer:
- 1 cup high-quality dark chocolate, chopped (or dark chocolate chips)
- 3/4 cup heavy whipping cream
- Creamy Ice Cream Layer:
- 2 liters (approx. 8.5 cups) premium vanilla ice cream (or your favorite flavor, such as chocolate or salted caramel)
- Magic Shell & Nut Topping:
- 10 ounces (approx. 280g) Magic Shell chocolate hardening topping
- 3/4 cup roasted and coarsely chopped peanuts (or your preferred nuts, like hazelnuts or almonds)
- Pinch of sea salt flakes (optional, to enhance flavor)
Instructions:
- Prepare the Cone Base:
- In a food processor, grind the waffle cones until they are coarse crumbs.
- Add the melted butter and cinnamon (if using), and pulse until well combined.
- Press the mixture into the bottom of a 10-inch springform pan, pressing firmly to create an even layer.
- Prepare the Chocolate Layer:
- Place the chopped chocolate in a heatproof bowl.
- In a small saucepan, heat the heavy cream over medium heat until the edges just begin to simmer (do not let it boil completely).
- Pour the hot cream over the chocolate, and let it sit for 1 minute to soften the chocolate slightly.
- Whisk the mixture gently until it is smooth and glossy.
- Pour the chocolate layer over the prepared base, spreading it evenly. Place the pan in the refrigerator for 30 minutes to allow the chocolate to set. At this time, remove the ice cream from the freezer to soften slightly.
- Prepare the Ice Cream Layer:
- Cover the outside bottom of the springform pan with aluminum foil to prevent any potential leaks.
- Once the ice cream is spreadable, evenly distribute it over the set chocolate layer. Use a spatula to smooth the surface.
- Prepare the Top Layer:
- Pour the Magic Shell topping over the ice cream layer. Work quickly, as the topping will harden rapidly.
- Before the topping sets, sprinkle the chopped peanuts (or other nuts) and sea salt flakes (if using) over the top.
- Freeze and Serve:
- Cover the pan tightly with plastic wrap and place it in the freezer for at least 5 hours, or preferably overnight, until the dessert is completely frozen.
- Before serving, let the dessert sit at room temperature for 5-10 minutes to soften slightly.
- Remove the sides of the springform pan, slice the dessert, and serve.
Additional Notes:
- For a richer flavor, consider using chocolate or salted caramel ice cream.
- You can garnish the dessert with extra peanut pieces or a drizzle of caramel sauce before serving.
- Make sure your ice cream is soft enough to spread easily, but not melted.
- If you don’t have a food processor, you can crush the cones in a sealed plastic bag using a rolling pin.


